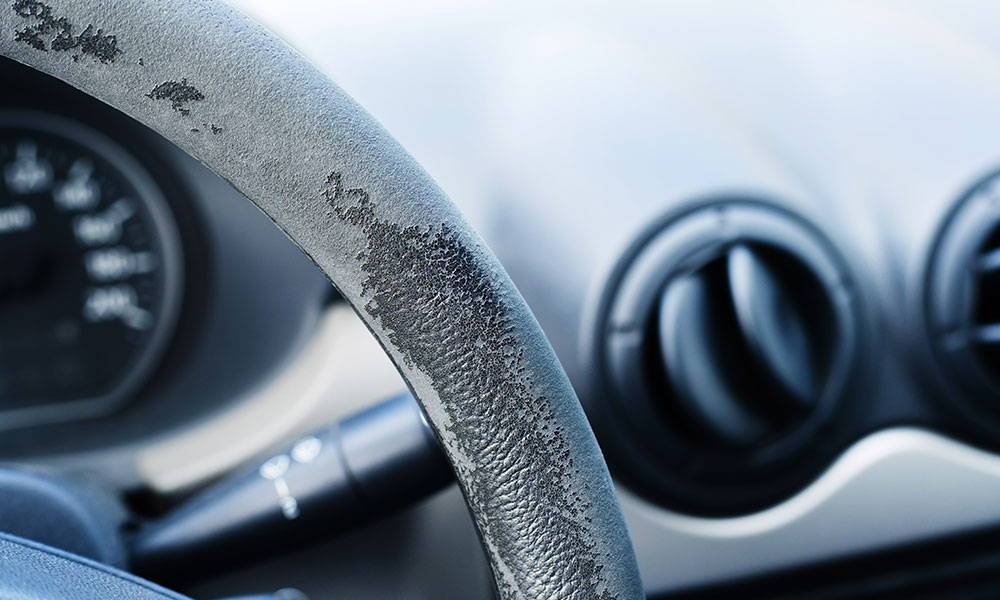
When you use your car regularly, its interior plastic surfaces are bound to pick up scratches over time. This is especially the case if you use the car for family duties, e.g. dropping off the kids at school, picking up groceries, carrying the pets, transporting house supplies, etc.
Scratches and marks can make your car’s interior look old and worn out. Nobody wants to spend time in a tired-looking cabin, so those marks can also negatively affect your car’s resale value. Thankfully, there are ways in which these scratches and marks on your car’s plastic interior trim can be removed. Let’s discuss some of them.
★★★★★ "Liquid gold!!!! We have a 2008 Jeep Commander and have always had an issue with the bumper and all the plastic trimming that would turn like a chalk white overtime. I have used many products trying to restore the finish on the plastic and nothing has worked. I just received my Plastic Restore from Torque and this product is amazing I applied it about a week ago and the jeep looks brand new again!!
Types Of Plastic Scratches
The plastic trim in your car can get scratched in many ways and by different agents. However, these scratches are generally of the following types. For even more detail on car scratches, check out our complete guide to the types of car scratches.
Scuffs
Scuff marks are caused when an object, e.g. a shoe or boot, rubs against the plastic surfaces in your car, and the dirt and/or exterior coloring of the object is transferred onto the plastic panel. Scuff marks are often seen on car door sill plates, the plastic panels between the seat and the door, and the inside panels of car doors. They are often made when people drag their feet when entering or exiting their cars.
Scuffs are mostly superficial, meaning they often don’t tear or damage the surface of the plastic.
Scratches
Scratches, on the other hand, fray or tear plastic panel surfaces, so they are deeper than scuffs. They’re often caused when objects with sharp edges, e.g. pocket knives or screwdrivers, accidentally rub against a car’s interior plastic surfaces.
Chips
At times, daily wear and tear can also cause bits of plastic to chip off the panels in your car. Chipping often happens in old cars with worn-out plastic paneling. As expected, chips are the most difficult to repair. When you notice your plastic panels are starting to chip, do your best to preserve the breakaway pieces, as it will be difficult to find similar-looking bits of plastic to replace the broken-off chips.
Cracks
Depending on its density and quality, car interior plastic may get brittle and crack in high-stress areas. Cracks may also occur in areas that are continuously exposed to direct sunlight. Some cracks are hard to see, so you need to carefully inspect your car’s interior plastic surfaces occasionally to check for cracks.
How To Remove Scratches From Interior Plastic Parts
Method 1.) Using a Heat Gun
When using a heat gun to repair scratches on car interior plastics, you need the heat gun itself, plus some fine sandpaper and an interior car cleaner.
You start by cleaning the plastic surface to prepare it for repair. Spray some of your interior car cleaner onto a microfiber towel and rub it into the surface in circular motions to remove all dirt and grime, then use another microfiber towel to wipe off the dirt and excess cleaning solution.
When the plastic surface is clean and dry, turn on the heat gun to a recommended heat setting and apply the heat to the scratched area of the plastic panel. Keep moving the heat gun up and down that area at a constant rate to ensure even heat exposure. Also, be sure not to heat the surface of the plastic for too long, as it can melt or become permanently damaged. Stop if you see that the surface is starting to lose its texture.
Once the surface has cooled and hardened, use your fine sandpaper to sand down any uneven areas to ensure a smooth, even finish. After that, clean the surface once again.
Method 2.) Plastic Scratch Polish Kits
Plastic scratch polish kits can be used to remove light scratches. Most plastic scratch polish kits include a plastic cleaner, a polishing compound, microfiber towels, and polishing/buffing pads. Some of these kits may also include a rubbing compound.
When using these kits, start by smoothing out the scratched area using fine sandpaper. Gently sand down the scratches until you can’t feel them. After that, spray the plastic surface with a plastic cleaner and use a microfiber towel to wipe off the dirt and residue. Then, use the polishing/buffing pads to liberally apply polish to the sanded area. Use back-and-forth motions, ensuring that the polish gets into the scratches. Once you’ve polished out the scratched areas, apply another layer of polish over the scratched area using light pressure. After that, allow the polish to dry. When it has dried, use a fresh microfiber towel to buff off the excess polish.
With the kits that include a rubbing compound, you don’t have to do the sanding because the rubbing compound can smooth out your car’s plastic surface just as well as sandpaper. Therefore, with such kits, you start by applying the rubbing compound to the scratched surface using a microfiber towel and wiping off the excess using a second towel. For better results, give the surface another rubbing compound application. After that, proceed with applying polish onto the scratched surface and then buffing off the excess polish using another microfiber towel.
★★★★★ "Liquid gold!!!! We have a 2008 Jeep Commander and have always had an issue with the bumper and all the plastic trimming that would turn like a chalk white overtime. I have used many products trying to restore the finish on the plastic and nothing has worked. I just received my Plastic Restore from Torque and this product is amazing I applied it about a week ago and the jeep looks brand new again!!
Method 3.) Filler Putty + Interior Grain Pads
This method is ideal for when you’re dealing with deep scratches or gouges that have to be filled in and repainted.
When dealing with deep scratches, it’s easier to work on the scratches when the plastic panel has been removed from the car; this will give you better access to the different sides and surfaces of the panel. However, if you can’t remove the scratched panel, use automotive masking tape to cover and protect the materials around the plastic panel, e.g. wood trim, leather, or vinyl.
First, use a razor to cut off any bits of plastic that may be protruding from the scratched area. You then sand down the scratches using sandpaper. After thoroughly sanding down the surface, clean the surface. Spray your car interior cleaner onto a microfiber towel and rub it into the surface of the plastic panel to remove debris from the sanding and any dirt and grime the surface may have had. After that, wipe off the dirt, grime, and debris with a fresh microfiber towel.
The next step is to make a grain pad that you can use for the filler putty. Spray a small section of the panel with a surface sealant and protectant (to prevent the glue from holding). After that, use a hot glue gun to apply glue onto a separate piece of plastic that’s just a bit bigger than the scratched area. You then press the glued side of the piece of plastic onto the section of the panel that you sprayed with the sealant. The glue will dry, and you’ll be able to pull off the piece of plastic without much difficulty. If you’ll do it well, the texture of the glued side of the piece of plastic will match the panel’s factory grain pattern.
Then, apply a coat of body filler putty onto the scratched surface and use a razor to spread it evenly over the scratched area. As the putty is drying, use the glued piece of plastic to imprint the puttied area with the factory grain pattern. Once the putty has fully dried, spray the entire plastic panel with paint that’s identical to that of the panel and let it dry.
Make That Interior Plastic Look Brand New With Plastic Restore!
After you’ve removed the scratches using any of the above methods, you need to bring back the factory look or shine of the plastic surface. One product that can help you do that effectively is Torque Detail’s Plastic Restore™. With its advanced nanotechnology, this product enhances and enriches plastic by changing its molecular structure. It works on polypropylene and rubberized plastics, as well as on rubber and vinyl surfaces.
When applying Plastic Restore™, you start by ensuring that the plastic surface is clean. Give it a quick wipe down with a microfiber towel. After that, spray the Plastic Restore™ liberally onto the surface of the plastic and let it sit for a few minutes as the product permeates the plastic. You can apply a second coat of Plastic Restore™ for better results. After that, use a clean microfiber towel to wipe off the excess fluid on the plastic’s surface.
Bonus Tip: The Buy-New Test
There’s no denying that at times, a car can get interior plastic surface scratches that are beyond repair, e.g. when something really heavy is pushed against or dropped onto the plastic. In such situations, try to see if you can get a replacement panel that matches the color of your scratched panel on sites like eBay or RockAuto. It may seem like a long shot, but you might be pleasantly surprised at the options you can get from there.
Cheap DIY Household Hacks For Repairing Plastic Interior Scratches
One cheap DIY household hack you can use to remove scratches on plastic is to use a mild abrasive like toothpaste or baking soda. You first clean the scratched plastic surface using a general car interior cleaner and dry it off using a microfiber towel. After that, apply the toothpaste or similar product onto a damp cloth and rub it onto the scratched surface in circular motions. Keep doing so until the scratches disappear. You then wipe off the excess toothpaste and debris using another towel. This method works best when dealing with light, superficial scratches.
For deeper scratches, you can try using several grades of sandpaper. Clean the surface first like in all the other scratch removal methods, then soak 800-grit sandpaper in water. When the sandpaper is saturated, sand down the scratched area using circular motions and with light pressure. The water helps to keep the sandpaper from being too abrasive, and it also helps to get sand and debris out of the way.
Continue doing this until the scratches disappear. After that, clean the area using a clean, damp cloth. To smoothen out the surface, take finer grit sandpaper, e.g. 1200-grit sandpaper, and sand down the scratched area. After that, clean the surface again using a damp cloth. Finally, polish the sanded area using a plastic/acrylic polishing compound to restore its original shine.
★★★★★ "Liquid gold!!!! We have a 2008 Jeep Commander and have always had an issue with the bumper and all the plastic trimming that would turn like a chalk white overtime. I have used many products trying to restore the finish on the plastic and nothing has worked. I just received my Plastic Restore from Torque and this product is amazing I applied it about a week ago and the jeep looks brand new again!!
Summary: Now You’re Scratch-Free!
The thing to remember with all these scratch removal methods is that they need to be done with care. If overdone or carried out without the right amount of care, they may remove the scratches but ruin the look of the plastic surface. Moreover, with car interior scratches, the best defense is prevention. Invest in scratch-preventing polishes and waxes for your car’s interior plastic surfaces.
I help run the day to day for America's Number #1 Car Wax Mirror Shine by Torque Detail. As a Certified Detailer by the International Detailing Association, I use that knowledge to help create products that get professional grade results with super simple application techniques.