Sooner or later, it happens - the deathly scratch, which completely devalues a vehicle and, if you're anything like me, is super irritating to look at! However, luckily for us, most scratches are pretty simple to remove with just a few products and tools.
Reverse is the newest car detailing product that easily removes scratches and swirls by hand. This car scratch remover and car paint scratch repair compound will bring your paint back to new. It's also a water spot remover and swirl remover. Make paint correction easy with this all in one formula.
Types Of Scratches
Before we get into how to remove a scratch, we need to understand that there’s a layer of risk involved. Burning through paint or making scratches look worse is very common if you don't know exactly what you're doing. So let's go over paint basics and the different types of scratches to better understand scratch removal and minimize any risk involved. For far more detail on each type check out our Ultimate Guide to Car Scratch Types.
Understanding the Layers of Paint
Paint is just like an onion - it has layers (Shrek reference), and each layer has a different end goal. Everything starts with the substrate, otherwise known as the surface being painted. The two most common materials painted on a vehicle are metal, such as aluminum, and plastic.
The first layer of modern-day paint is referred to as primer, and the primer’s job is to fill in any imperfections in the substrate and allow the other layers of paint to properly bond to the plastic and metal surfaces. The next layer of paint is known as the base or color coat, which provides the paint its color. Finally, one of the most important layers of paint is the clear coat, which gives the paint its gloss and UV protection. Each of these layers works as a team to provide your car with the glossy and radiant-looking paint that everyone enjoys!
Light Scratches (Clear Coat Scratch)
Screenshot from Pankaj's car scratch video.
Because the clear coat is the top layer of the paint system, it will be the first to be affected by the environment, including scratches. Light scratches, otherwise known as clear coat scratches, are not the worst-case scenario, since these are typically quite easy to remove by hand or machine along with some polish.
Paint Transfer Scratches
Screenshot from ChrisFix's paint scuff video.
Paint transfer is just that. Maybe a white vehicle swiped an orange cone or a black vehicle swiped a white car. It might look like the paint has completely rubbed off, but in reality, the paint or material from the other object has just rubbed itself onto your paint, leaving paint residue or transfer. Most paint transfer lies on the surface of the clear coat, keeping everything else underneath safe, so even though it might look bad, the damage is not severe.
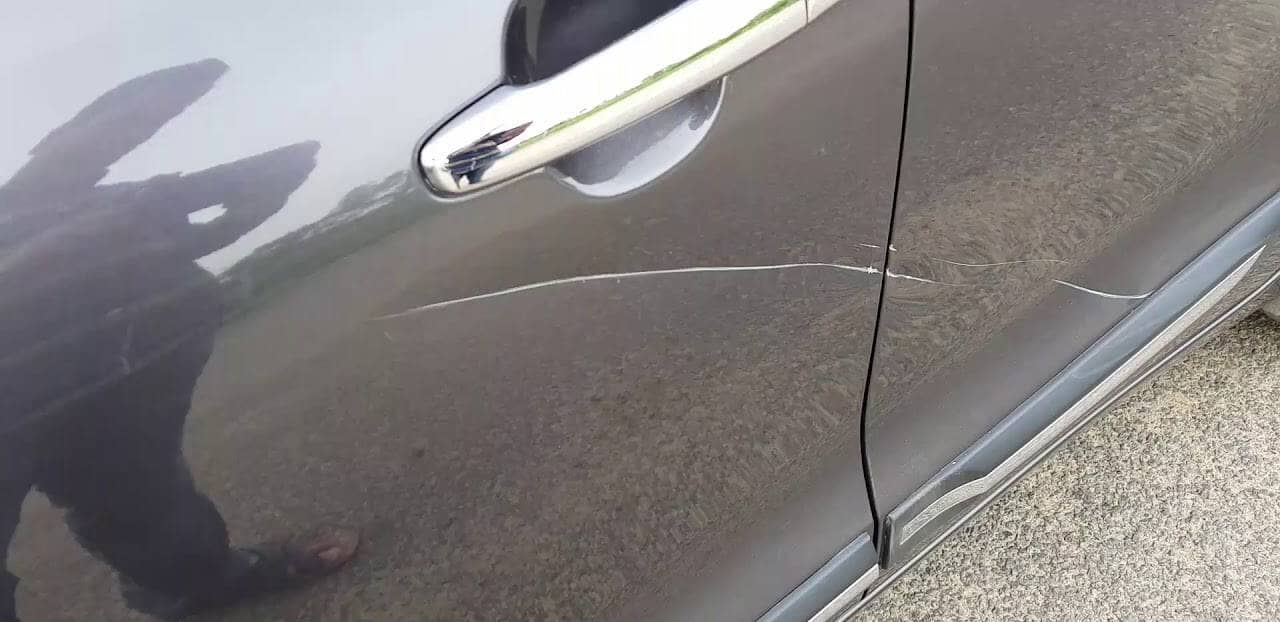
Deep Scratches (Base Coat and Primer Scratches)
Here is where car owners run into problems. Scratches that go completely through the clear coat and reach the base coat or primer are considered deep scratches. These are some of the most difficult to remove, and at times even professional detailers can’t remove some scratches that have compromised both the base coat and primer.
Plastic Scratches
Many modern-day vehicles have a lot of plastic parts because they’re cheaper to produce and easy to replace when damaged. Because of the increased prevalence of plastic on vehicles, many car owners run into plastic scratches. Luckily, depending on how deep these scratches are, they can be repaired, but most of the time, plastic parts are easily replaceable as well.
Swirl Marks
Swirl marks, sometimes called spider webs, are the most common form of scratches on paint. Swirl marks are just thousands of light clear coat scratches that are applied to the surface in multiple directions and causing that spider webbing effect. Swirl marks are typically formed over time because of improper washing techniques and automatic car washes. They’re usually easy to remove because they’re considered light scratches, but we find that vehicles that are treated with automatic car washes on a regular basis develop a lot of swirl marks, causing paint to look unhealthy and dull. If you have a new car and you start developing swirl marks, you or the automatic wash is likely doing a poor job of washing the vehicle.
The Clear Coat Scratch Test: Figure Out If Your Scratch Removal Job Will Be Easy
Now, how do you know what type of scratch or paint defect you have? The last thing you want to do is waste time trying to fix a scratch that’s too deep and impossible to remove. Well, luckily for us, there are some really simple ways to test scratches! The first is the water test, which is perfect for light scratches that are just in the clear coat. Take a spray bottle and fill it up with water, spraying it liberally on the scratch. If it disappears, it can be considered a light scratch that's located in the clear coat and has not yet reached the base coat.
If the scratch still looks like it's there after the water test, you're probably dealing with a deeper scratch. Now we have to figure out if the scratch is too deep to fix, and for that, we would use the fingernail test. Using the tip of your fingernail, gently glide it over the scratch. If the scratch is going left to right, you would glide your fingernail up and down and vice versa. If your fingernail doesn't catch, you’re most likely able to remove the scratch, but if your nail does catch, the scratch is probably far too deep into the base coat or the primer for you to safely remove.
How Do Paint Scratch Remover Products Work?
Paint scratch removers are all similar in concept; they either use some form of abrasive to level the scratch or some type of filler to mask it. A perfect form of the abrasive scratch removal would be Torque Detail’s Reverse Scratch Remover, while an example of a filler would be a scratch removal pen. Most professionals prefer the abrasive option, since it permanently removes the scratch rather than just masking or in other words hiding it like fillers and scratch removal pens.
How To Remove Scratches And Swirl Marks Using Torque Detail Reverse Scratch Remover (No Polisher Tool Needed)
Video above by a passionite Reverse customer!
Torque Detail Reverse Scratch Remover is a great, easy-to-use scratch remover that provides professional results safely. It uses high-tech diminishing abrasives, allowing you to level scratches and swirl marks while providing a haze-free, glossy finish.
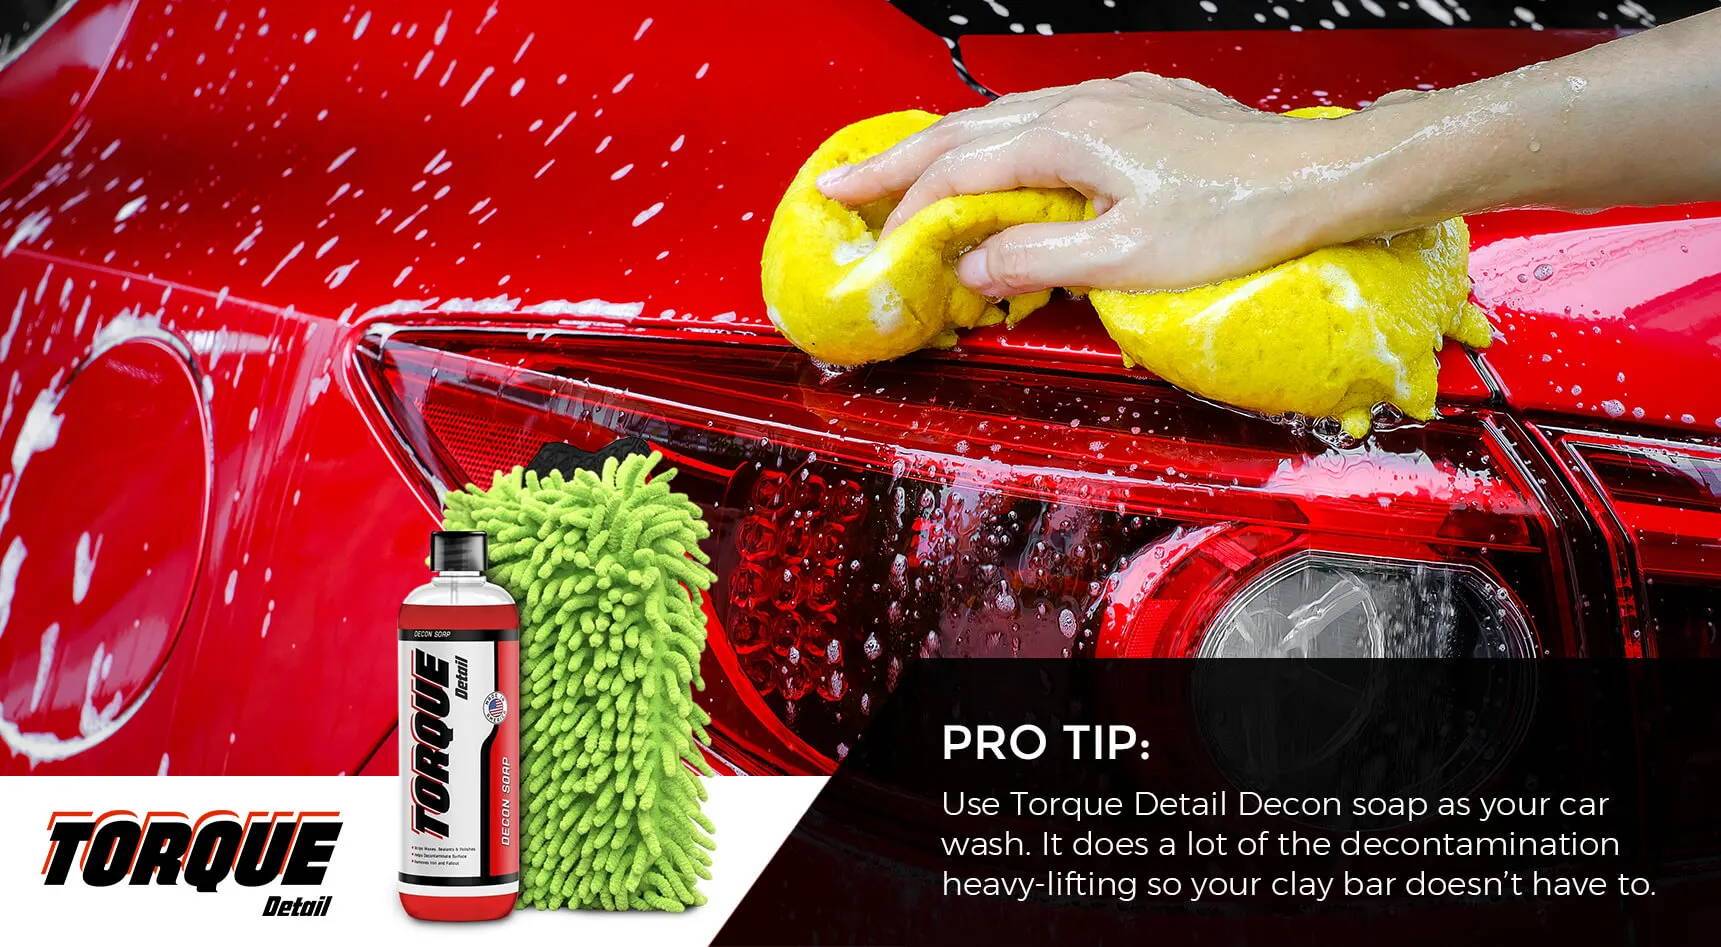
First, make sure to clean the affected area of the vehicle - we recommend a quality waterless wash like Turbo Waterless Wash. After the area is clean and dry, grab a new microfiber towel or applicator pad and apply a few drops of Reverse Scratch Remover, buffing the area. Work in circular overlapping motions with light to medium pressure.
With a new microfiber towel, wipe off the excess residue to reveal a scratch-free high-gloss shine! If the scratch is still there, repeat the process until satisfied - just remember that if the scratch is too deep, you might not be able to remove it. So, make sure to test the area prior to using Torque Detail Reverse Scratch Remover.
Finishing Off The Job With A DIY Ceramic Coating For Additional Shine and Protection
Now that the scratch is removed, it’s always recommended to add quality protection afterward. Any time you remove a scratch, you remove a small amount of clear coat, so it’s super important to protect that area afterward. A ceramic coating would be the best option, so check out Torque Detail Ceramic Spray, which provides amazing shine and gloss along with a year's worth of protection.
The great thing about Ceramic Spray is that it’s super easy to apply! Just make sure the surface of your vehicle is clean and in a shaded area, spray on the product evenly, and with a fresh microfiber towel, buff to a high-gloss shine. Yup, it’s that simple! After you apply the Ceramic Spray, make sure to give the product 24 hours to cure, meaning avoid water and keep driving to a minimum. This allows the ceramic particles to cure properly, giving your paint the highest gloss and protection possible.
How To Remove Stubborn Clear Coat Scratches
Sometimes even the best polish and scratch remover can't remove stubborn clear coat scratches. This time, we’ll be using some 3,000 and 5,000-grit sandpaper in order to remove the really stubborn light to medium scratches.
After thoroughly cleaning the vehicle’s surface with soapy water and a microfiber towel, grab your bottle of soapy water and spray down the area where the scratch is, along with your 3,000-grit sandpaper. You want to make sure that both surfaces have a good amount of lubrication so we can wet-sand the surface safely. After you get both surfaces wet, grab your 3,000-grit sandpaper and lightly sand the scratched surface, first in cross-hatch horizontal motions, then cross-hatch vertical motions, making sure to overlap. Continue this process with little to no pressure for about 10 to 15 seconds. You should start seeing a milky-white residue appear where you’re wet-sanding. Once you start seeing that milky-white residue, stop and dry off the surface. After the surface is completely dry, you should have a uniform haze where you sanded. Continue this process with the 5,000-grit sandpaper.
After you’ve completed the wet-sanding process, we recommend using a dual action polisher with a foam polishing pad to remove the scratches and sanding marks. If you don't have a machine polisher, no worries - you're just going to need a little more time and elbow grease, using the previous steps we listed prior, along with Torque Detail Reverse Scratch Remover. Grab your polishing tool and pad and apply 4 to 5 pea-size drops of Torque Detail Reverse Scratch Remover, then dab the product across the panel. Start your polisher at a comfortable speed and, with light pressure, work it in a cross-hatch motion similar to the wet-sanding process until the polish becomes transparent. If you still see sanding marks left behind, repeat the machine polishing process until satisfied.
Reverse is the newest car detailing product that easily removes scratches and swirls by hand. This car scratch remover and car paint scratch repair compound will bring your paint back to new. It's also a water spot remover and swirl remover. Make paint correction easy with this all in one formula.
How To Remove Paint Transfer Scratches Using WD40 And A Magic Eraser
Paint transfer looks horrible, but luckily, it's super easy to remove! We always recommend using the lightest form or removal prior to the most aggressive, so try Torque Detail Reverse Scratch Remover prior to our next method. If Torque Detail Reverse Scratch Remover worked, great! If not, no worries - just grab some WD40 and a magic eraser. Because WD40 is 50% mineral spirits, it’s a great safe option to soften the paint transfer, allowing us to remove it with the magic eraser.
Spray WD40 on the paint transfer and let it sit for 20 to 30 seconds, spraying as much as needed to keep the surface wet. Then, grab a magic eraser and dunk it into some water, making sure it's wet but not dripping. Now, with little to no pressure, rub the magic eraser onto the paint transfer until the transfer is removed. Make sure to keep the magic eraser on the paint transfer only to avoid removing your clear coat. You’re also welcome to use Torque Detail Reverse Scratch Remover to polish the affected area to a high-gloss shine after you remove the paint transfer.
How To Fix Plastic Scratches
Plastic scratch removal can be a mixed bag - depending on the depth of the scratch, it can be impossible to remove. However, if it's a super light surface scratch, it can be possible to remove or at least improve.
After cleaning the surface with some soapy water and letting it completely dry, grab a heat gun. Keeping the heat gun 6 to 8 inches away from the surface, turn it onto a low to medium heat setting, making sure to move it side to side over the scratched area. The goal is to basically level the scratch into its surrounding area with heat. The process is very similar to polishing, but rather than using abrasives, we’re using heat to level the surface. After a few moments, you should see the scratch basically disappear into its surroundings. Make sure not to get the plastic too hot or you'll melt it completely - remember to remove the heat gun from the area and let it breathe every 5 to 10 seconds. Always keep in mind that you're using heat on plastic, so there's always a chance of damaging the surface or the painted surfaces around it. Luckily, most plastic trim pieces are cheap and easy to replace, so that might be a better option!
How To Use Touch-Up Paint To Fix Deep Scratches On Car Paint
Touch-up paint, when used correctly, is a great option for super deep and wide scratches that can’t be removed with just polish. Our goal with touch-up paint is to fill the scratch until it’s level with the rest of the paint. If you apply too much touch-up paint, the repair will look uneven and blotchy. We recommend purchasing an all-in-one touch-up paint so that you’re applying your color and clear coat in one step.
The first step is to clean out the scratch with IPA and a Q-tip, as we need the scratch to be perfectly clean so that the paint touch-up can properly bond. After the scratch is clean and dry, lightly apply the touch-up into the scratch one layer at a time. Remember that paint needs some time to dry prior to applying more, so leave 30 minutes to an hour in between layers or you'll just be moving around wet paint. Continue this process until the touch-up paint is level with the rest of the painted panel. If you have a two-step system, meaning you have a color coat and a separate clear coat, make sure to leave some room to layer your final clear coat. After all your paint is applied and leveled, let the paint cure for 24 to 48 hours, then follow the step-by-step process on how to remove stubborn clear coat scratches listed previously in this article. This process will help you blend the touch-up with the rest of the paint, giving you better results.
You're Fixed! Now, How To Avoid Car Scratches In The Future?
Okay, so you probably spent an hour reading this article and a whole afternoon fixing your scratches, and I'm sure you don't want to do it all that again! So let's go over a few tips and tricks to avoid scratching your paint moving forward.
Apply a Protective Coating such as Ceramic Spray
Ceramic coatings are a great option that can prevent super light surface scratches. Professional-grade coatings are your thickest layers of protection, but easy-to-apply DIY options like Torque Detail Ceramic Spray are great as well! The SIO2 ceramic coating will provide your paint with a sacrificial layer of protection, giving you peace of mind from bird droppings, light surface scratches, and other environmental hazards.
Park Perfectly Center in Your Spot and Avoid Parking Next to Bad Parkers
Parking correctly is also a great way to avoid scratches! You might be in a rush, but parking at an angle in a parking spot will only increase the chances of someone carelessly dinging your car. Parking away from the crowd is also a great way to avoid scratches (and a great way to get some cardio in with a brisk walk to your final destination)!
Don’t Tailgate Other Vehicles
Tailgating is never a great way to drive - not only is it dangerous, but it's also easier for your vehicle to run into scratches and chips from debris being thrown up by the driver in front of you. Keep your distance from other vehicles - your paint and fellow drivers will thank you!
Park in a Garage or Carport
Garage parking is a great option to protect your paint in general, as it protects the vehicle from dust and environmental fall-out, but also the chance of environmental debris from wind and storms damaging your vehicle. Carports are also a good option to keep environmental damage at a minimum, just as keeping some space between your vehicle and others on the road does.
Clean Off Bird Poop the Proper Way
Many people don't know that bird poop is very acidic and also very abrasive, so if you clean it improperly, it can etch and even scratch your paint. Cleaning bird poop off properly with a quality hand wash or waterless wash is a great option to avoid scratches and further clear coat damage.
Wash and Maintain Your Vehicle the Proper Way
The final and most important step in keeping your vehicle looking great and scratch-free is proper vehicle upkeep. Regular hand washes, clay bar maintenance, and ceramic protection are all important steps. Starting with the hand wash, make sure you're using quality car soap and the two-bucket wash method in order to keep your car clean and avoid light surface scratches like swirl marks. A clay bar will keep your vehicle's paint contamination-free, so you don't have to scrub your paint during your wash process. It's recommended to clay your vehicle only when needed. If your car's paint still feels rough after handwashing it, you probably need to clay it. Finally, protect your paint on a regular basis. If you're using Torque Detail Ceramic Spray, make sure to re-apply the coating every year after application or whenever you see the protection start to degrade from the surface.
Reverse is the newest car detailing product that easily removes scratches and swirls by hand. This car scratch remover and car paint scratch repair compound will bring your paint back to new. It's also a water spot remover and swirl remover. Make paint correction easy with this all in one formula.
Summary
Scratch removal varies from situation to situation, but with the right tools and knowledge, most scratches can be removed with ease. Just remember to take everything step by step, and when working on deeper scratches, a great motto is this: fix to improve, not to remove! Paint is a very delicate surface, so you want to make sure you treat it as such. Other than that, follow our instructions and you’ll have a scratch-free finish in no time!
Zaia is the founder of CarNewba Detailing, a premium detailer shop based out of Arizona. Trained by world renowned detailers, Zaia has over 6 years worth of experience and 12+ detailing certifications ranging from the International Detailing Association CD & SV to all 6 Detailing Success Certifications.