Your car looked amazing when you got it from the factory. Glistening shine, rich colors, deep reflections. A couple of years later, your daily driver has lost some of that luster.
Perhaps you’re buying a new-to-you vehicle. It’s all fantastic and works great, but the paint needs some TLC.
Maybe you have a trusty truck that’s been hauling gear since the late nineties. You know it like the back of your hand and won’t give it up for a modern electronically-dominated car to save your life.
The common thing with all these vehicles is they can all look a hell of a lot better with some paint correction.
Reverse is the newest car detailing product that easily removes scratches and swirls by hand. This car scratch remover and car paint scratch repair compound will bring your paint back to new. It's also a water spot remover and swirl remover. Make paint correction easy with this all in one formula.
- Repair car scratches, swirl marks and water spots.
- Will also remove oxidation, spider marks and paint imperfections.
- Works by hand, no fancy tools needed.
- Contains no fillers, silicone or wax.
- No hazing, no streaking.
- Product contains 4oz of all-in-one paint correction compound.
What Is Paint Correction?
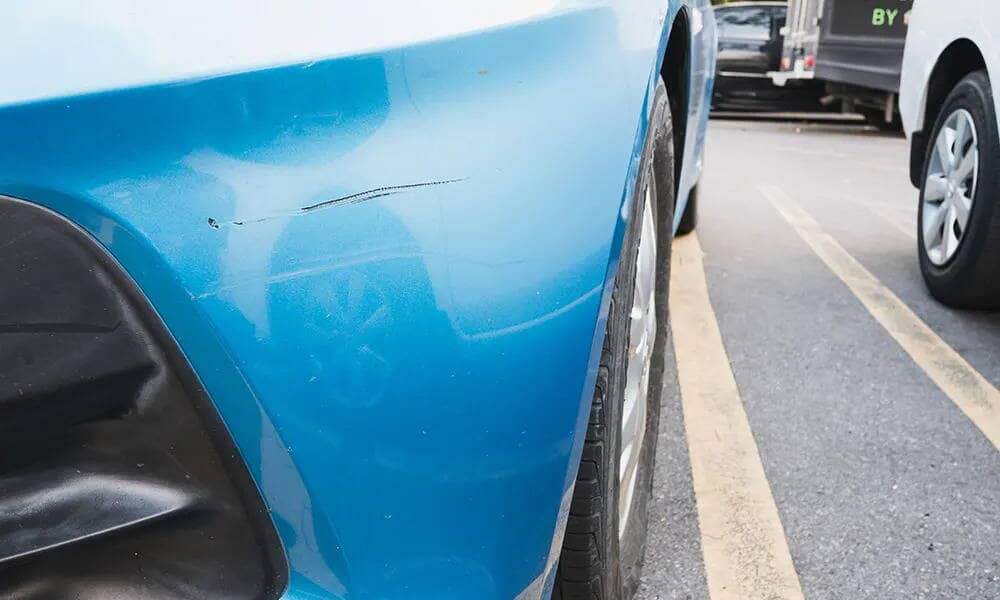
Paint correction is the general name given to any service that removes paint defects like stone chips, chemical etching, bonded contamination, fine scratches, swirl marks, holograms, and hazing.
Drop by our dedicated article on paint composition and the types of car scratches you can encounter here: Types of Car Scratches Explained (The Complete Guide).
These defects accumulate over time, but will vary depending on:
- How, where, and when you drive the car
- Where it stays overnight
- Your local climate/environment
- The chemistry of the paints and the processes used to apply them
Depending on the need, a vehicle will be treated with a decontamination pass. touch-up paint and refinishing, multi-stage polishing, and coating and protecting the new finish.
How Long Does It Take?
Removing these defects will take several different routes depending on the condition of the paint and the desired results. Here’s how long it takes to detail your car in general.
You can spend 5 or 50 hours detailing your paint, depending on whether you're touching up a daily driver or a concourse vehicle. Once you get past a certain point, any improvement requires immense time and effort to achieve.
However, you could also get 80% improvement for 20% of the effort. A decontamination wash plus a swirl and scratch remover product will restore the shine and gloss of your paint, while leaving just a handful of imperfections behind. You could do this at home over the space of an afternoon with $100 worth of hand-applied products.
Vehicles with several years of regular daily wear and tear will benefit greatly from a two-stage polishing that could be done in a day by a professional detailer.
Then there are vehicles in severely deteriorated condition, which may need to spend a week in the detailing shop.
How Expensive Is It?
The cheapest DIY kit will cost you around $100 or so, and you’ll have to dedicate most of a weekend to go through the various stages. However, for less intensive damage, you might be able to fix your problem for a much lower cost.
Going for a professional detailing service can cost anywhere from a few hundred to a few thousand dollars. Average prices hover between $300 and $600, while a vintage Ferrari may cost $5,000 to correct the factory paint and perform a complete detailing and paint protection service.
Why Not Just Repaint The Whole Panel / Car?
There’s a limit to how much you can correct before the paint is too far gone. However, if possible, it’s usually recommended to touch up and correct paint, and then repaint.
Repainting is expensive - usually two to three times more costly than restoring the existing paint to nearly perfect condition. The factory-original paint is a value item in expensive luxury and super sport cars.
Plus, newly painted body panels are usually far from perfect and need some amount of paint correction anyway. Finally, if your car is painted in a custom color, matching the exact one without a color code can be a body shop nightmare.
Easy Paint Correction (Ideal For Beginners)
Want to DIY your paint correction? That’s absolutely possible. We wouldn’t call it easy, as it’s quite labor-intensive and not just mindless work, either. Doing it wrong can add more and deeper scratches into the paint than you remove.
With that said, anyone can do paint correction. If you’re a beginner, follow these steps and you’ll get 80% of the work done for 20% of the hassle.
Thorough Cleaning And Paint Decontamination
The first step in any detailing service is to meticulously clean and decontaminate the paint.
It all starts with a regular wash. Use your favorite contact wash setup - a foam cannon, two buckets, whatever you fancy. A touchless wash is okay for weekly maintenance, but not nearly enough to remove all the dirt and dust lodged into the surfaces.
Next, you want to decontaminate the vehicle and remove the vast majority of bonded contaminants. You’re going to be scrubbing and wiping the surface later. Any unexpected solids can smear onto the surface, leaving awful scratches in the surface and creating even more work for you.
Over time, brake dust, minerals, salts, some chemicals, and overspray will find its way onto the surface and penetrate the pores of the car’s clear coat. These contaminants accumulate and dry over into a solid that’s physically bonded to the surface of the paint.
If you don’t have one already, grab a Decon Wash Kit from Torque Detail. It contains several products you need for complete bumper to bumper decontamination:
- Decontamination Soap and Wash Mitt - This shampoo has special chemistry that dissolves the iron particles in brake dust, the minerals in water spots, and the other salts and chemicals etched into the clear coat. Once dissolved in the solution, you can wash away. Use a dedicated wash mitt - not the same one you just scrubbed the dirt off with.
- Clay Pad and Clay Lube - The clay pad is a malleable, putty-like material. You can shape it any way you want and scrub the surface. It has fine abrasives that break away any bonded contaminants, removing them from the surface and trapping them in the clay. After a couple of minutes of work, you’ll find the clay pad is loaded with grime, despite washing the car 20 minutes ago. Always use dedicated clay lube - a product that makes the surface slippery and helps the clay glide easily, reducing the amount of scratching on the surface.
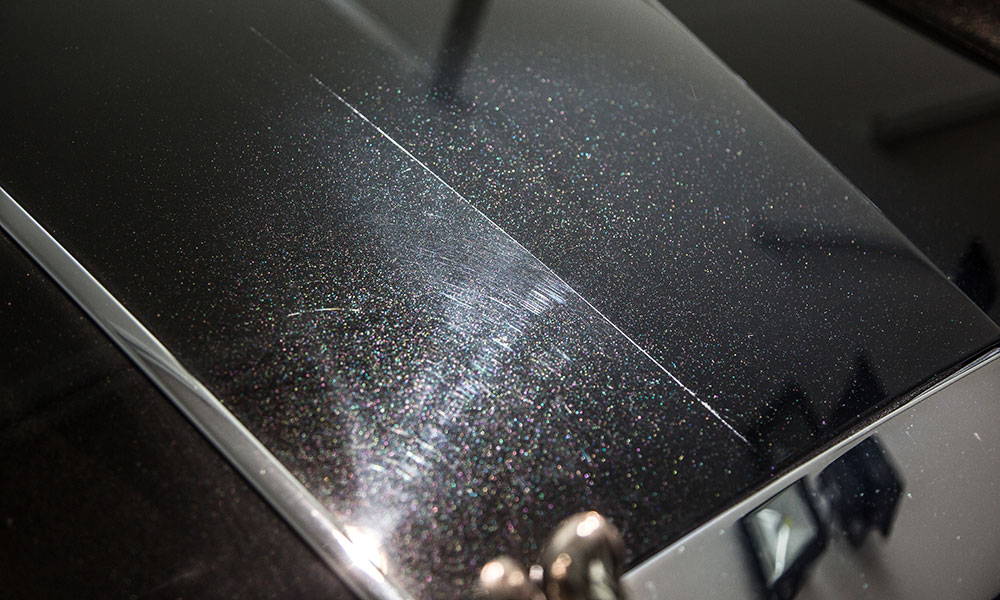
After decontamination, you can simply rinse off the car. Once dried, you should notice that it’s a lot brighter and shinier than before. Claying always leaves a fine layer of scratches, but don’t be concerned - it’s inevitable when you’re using abrasives.
The following step will remove these, along with the majority of light scratches, swirl marks, spider-webs, and hazing.
Car Scratch Removers
These products are polishing compounds. They’re a kind of liquid or paste-like product mixed with abrasive particles.
You use them with a microfiber towel and rub on the paint. The abrasives act like microscopic sandpaper, leveling and smoothing the surface. After a few minutes of rubbing, wipe with a clean towel and inspect your results. The paint should be considerably brighter and shinier with fewer visible imperfections, even when viewed under a strong inspection light.
Go back and forth several times, polishing and wiping the panel until it gets to a desirable state. Acknowledge that you cannot mend any deep scratches that penetrate under the clear coat, although you can certainly improve the vast majority of light scratches and imperfections.
Torque Detail’s Reverse: Car Scratch Remover is an all-in-one paint correction compound that will remove light scratches, scuffs, swirl marks, chemical etchings, water spots, and other deposits, as well as baked-on brake dust, oxidation, and other imperfections.
It’s ready to use out of the box and you only need a microfiber towel to apply it - no power tools required. When you’re done using it, your paint will look like a brand new car from any normal viewing distance.
Advanced Paint Correction Process
The above procedure is not the optimal way to do paint correction, but if all you’ve got are towels, buckets, and a garden hose, it will get you results.
If you drop your car into a detailing shop, the people there will use a more complex but effective procedure.
Thorough Cleaning And Paint Decontamination
This process is exactly the same, regardless of whether you’re detailing your daily driver in the garage or having a McLaren roll into the shop.
The amount of effort and quality of the products used will be different, of course, but the process never really changes.
Surface Prep
Since professional detailers will almost always use machine polishing, they need to do additional surface preparation.
Measuring Paint Thickness
Polishing is a mechanical abrasion process. You’re removing some material in order to flatten out imperfections.
Machine polishers can be awfully aggressive, especially in the hands of beginners. If you don’t know what you’re doing, it’s easy to go too far and reduce the clear coat to an unsafe thickness, or else to sand through it altogether.
Any professional detailer will have an electronic paint thickness gauge. This will probe the paint and give you a reading about the thickness in the particular spot - either in mils (imperial - 1/1000 of an inch) or in microns (metric - 1/1000 of a millimeter). A healthy factory clear coat will measure about 50 microns, with the full paint stack measuring about 120-150 microns thick. That’s not a lot.
The paint thickness gauge is invaluable for assessing the paint you have to work with and establishing your polishing strategy to keep it safe.
Masking And Blocking Off Sections
Rotary polishers are amazing for large surfaces, but a hassle to maneuver around corners, tight edges, and trim pieces.
Obviously, you only want to polish the paint and keep other materials away so that you can detail them separately.
A quick way to gauge who you’re dealing with is to ask about the masking process or watch them do it on somebody else’s car (preferably). A professional detailer will mask trim pieces, seals, and other items to get a perfect finish on every part. A shabby detail shop will just run the polisher over everything without any regard.
Multi-Stage Polish
The detailer will perform an initial polish. They may be working with a paint of unknown hardness, so they’ll test different machines, polishing pads, compounds, and settings to find the best setup for each particular car.
When they get it right, they’ll perform a pass over the entire panel to remove the majority of surface imperfections, light scratches, oxidation, mineral deposits, chemical etching, etc.
Experience is key here. Working with the wrong settings or technique can compromise the clear coat and cause paint damage.
If you’re unsure, take it slow:
- Equip your random-orbit polishing machine with a softer microfiber pad.
- Choose a single-stage cutting compound and add 3-5 small dabs onto the pad.
- With the machine off, smear the polishing paste onto the panel.
- Put the polisher on its slowest setting and evenly distribute the product over the working area. Choose a smaller area at first - a quarter of the panel or so.
- Turn up the speed to medium. Only go to higher settings if you’re confident and there is sufficient paint thickness in the work area.
- Keep the machine moving an inch or two per second. Use straight motions - top to bottom and side to side, overlapping some 30% on each stroke. Don’t sit in the same spot or you can overheat the paint and cause damage.
- Wipe the panel and inspect every few minutes. Apply more polish and continue until satisfied with the results.
Experienced detailers will use a multi-stage polishing strategy, performing passes with different setups for heavy, medium, light cutting, and finishing.
For well-maintained vehicles, one or two stages of machine polishing is usually enough to restore the paint to factory condition.
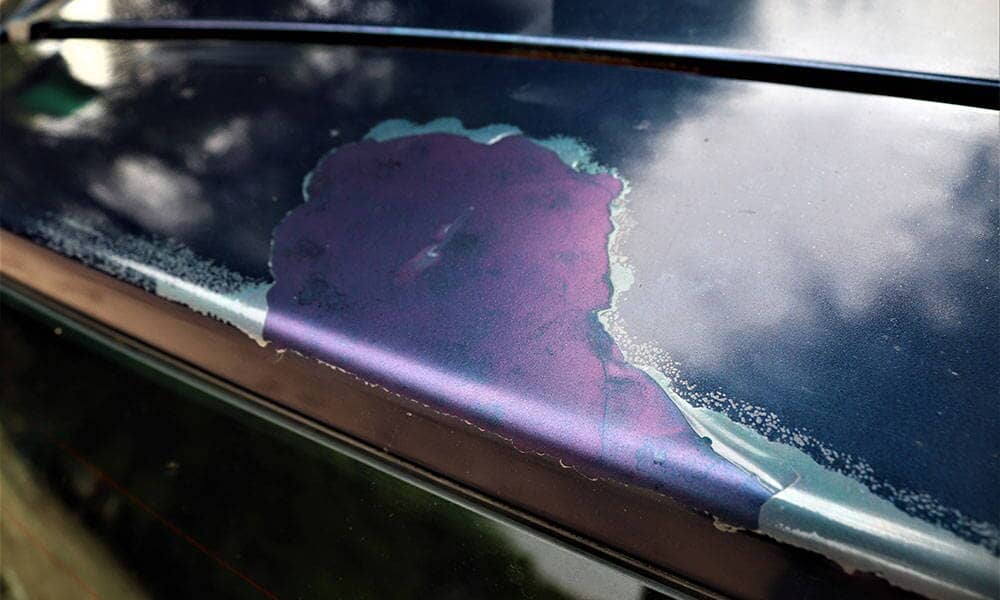
Stone Chip And Deep Scratch Repair
Stone chips and deep scratches penetrate past the clear coat and into the color and primer, and sometimes even down to the bare metal. These won’t come out with just polishing. While you can still get great results, closer inspection will always reveal such defects.
The process for their removal is a lot more complicated, and requires you to sand through and repaint various layers to restore the original finish. If it’s your first time, practice on a junk panel first.
Step 1) Sand Around The Affected Area
To remove a stone chip or deep scratch, you have to sand the area and level the paint entirely. Use fine sandpaper (1,000-3,000-grit) and a sanding block, working with short strokes and no pressure.
The sanded area should look uniform and have a matte finish. It’s finished when there are no individual scratches visible and you can’t feel any peaks or edges on the surface.
It’s going to get worse before it gets better.
Read our Peeling Clear Coat Repair Guide to learn how to create blend zones in the clear coat.
Step 2) Clean The Work Area
Wipe the area clean with a damp towel and follow up with a water-isopropyl-alcohol mix, then let it dry before proceeding.
Step 3) Apply Touch-Up Paint With A Fine Brush
So long as the car is painted in a factory color, you should be able to buy a touch-up kit with the following products:
- Primer
- Color-matched paint
- Clear coat
- Paint thinner
- Rubbing compound
You can get a kit from your local dealer, or from many automotive parts stores and paint companies. Most shops can even select and send you the exact colors in the mail just by reading your VIN.
Depending on the size of the imperfection on the paintwork, the paint comes in marker-like pens or small bottles, similar to nail polish. In fact, the process isn’t that different, so somebody who can do nails will absolutely thrive at stone chip repair.
Always read the manufacturer’s recommendation for applying and curing the paint. Depending on the severity, start with the primer or color coat. Make sure it’s sufficiently dry before applying the next layer. Give each layer a minimum of 24 hours to dry and set, using fine sandpaper to test - if the paint gums up, it’s still too soft.
Finally, follow up with a clear coat, but extend the area of application so that you can blend it with the rest of the existing clear. Add as many layers as the manufacturer recommends.
Step 4) Wet-Sand To Level The Area
Using wet sandpaper and plenty of water, wet-sand the area to blend the newly applied clear coat to the old clear coat.
Focus on the chipped/scratched area. Start with 2,000-grit sandpaper and focus on leveling the chipped/scratched area with the rest of the panel. Then, switch to higher grit and expand the work area.
The idea here is to remove any sharp lines and get the surface uniform. It will still look matte, faded, and noticeably visible.
Step 5) Polish And Finish
Finally, perform several polishing/buffing passes with your random-orbit polisher. Start with a heavy-medium cut, then a light cut, and finally a finishing pass. Polish until satisfied with the results.
Know When To Stop
Remember that this is paint repair, not a repaint. It’s never going to be 100% perfect, and a detailed inspection will always reveal some imperfection.
However, from any normal viewing distance and to unsuspecting observers, the paint should look absolutely perfect, with renewed shine, deep color, and glossy reflections.
Protecting Your Work With A Ceramic Coating
After all that work to get the car back to a factory-finish look, you’ve got to be wondering why the hell you didn’t protect it in the first place.
If you care about how it looks and/or want to keep its resale value high, there’s no real argument to not putting some paint protection on your vehicle. The cheapest waxes and sealants will only run you about $20, and will have a tremendous, albeit short-lasting effect.
Ceramic coating will cost you some $100 for a high-grade DIY kit, and only half that for a spray-on ceramic coating. Ceramic coatings create a microscopically-thin, glass-like layer on top of the paint, protecting it against UV rays, heat, tree sap, bird poop, bug splatter, road tar, dirt, brake dust, mineral deposits, and other contaminants.
Ceramic coatings are also easy to clean and maintain, giving the paint hydrophobic and anti-static properties to repel water and dirt.
Check out Torque Detail’s Ceramic Spray - a spray SiO2 paint sealant that applies in minutes, but gives you up to 12 months of protection and a water-beading effect.
If you also want to protect your car from stone chips and heavy scratches like the ones you’ve just repaired, you need paint protection film. These can run you several hundred to several thousand dollars, depending on whether you want to wrap the whole car or just the high-impact areas.
Read more about paint protection film in our dedicated article: What Is Paint Protection Film (PPF)? The Complete Rundown.
Reverse is the newest car detailing product that easily removes scratches and swirls by hand. This car scratch remover and car paint scratch repair compound will bring your paint back to new. It's also a water spot remover and swirl remover. Make paint correction easy with this all in one formula.
- Repair car scratches, swirl marks and water spots.
- Will also remove oxidation, spider marks and paint imperfections.
- Works by hand, no fancy tools needed.
- Contains no fillers, silicone or wax.
- No hazing, no streaking.
- Product contains 4oz of all-in-one paint correction compound.
Summary: Paint Correction In A Nutshell
And there we have it - that’s the basic guide to paint correction.
Anyone can learn to use a polishing machine and get 95% of the work done at home for a negligible investment in tools and products. It’s a great way to save a few hundred dollars and detail your own car.
Stone chip and deep scratch repairs border on auto body and paint shop work - definitely a big hassle that requires quite a bit of experience to get good and long-lasting results.
There are also many details we skipped over here, but look out for our links to other pieces of content that go into even more detail about the process.
I help run the day to day for America's Number #1 Car Wax Mirror Shine by Torque Detail. As a Certified Detailer by the International Detailing Association, I use that knowledge to help create products that get professional grade results with super simple application techniques.